

Help Center
Support for troubleshooting your installation or repair.
Fix-It Wizard: Vacuity
-
I think the trapway is partially blocked, what should I do? Snake it?
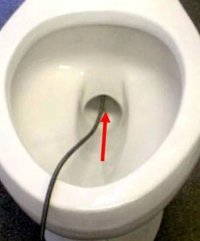
- To snake the front part of the trapway, insert the snake into the bowl — you will only be able to insert the snake part way.
- As soon as you feel resistance remove the snake; otherwise you risk it becoming lodged and you may end up breaking the toilet to retrieve it.
- To snake the back part of the trapway you must first remove the tank lid.
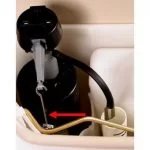
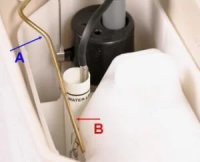
- Remove the plastic vacuum jug. (See figure 1.1)
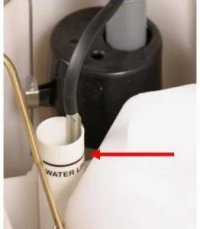
- Insert the snake into the vacuum tube. (See figure 1.2)
- Once you are finished snaking the back part, replace the vacuum jug and tank lid.
- Flush to test.
Figure 1.0
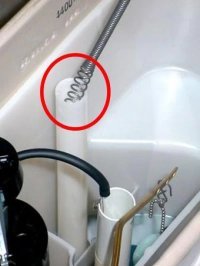
Figure 1.1
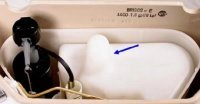
Figure 1.2
-
My Vacuity runs constantly, I have to jiggle the handle to get it to stop.
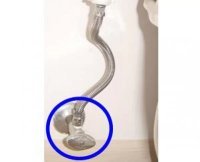
- Turn off water at the floor supply valve. (See figure 1.0)
- Flush the toilet to remove the water from the tank.
- Remove the vacuum jug. (See figure 1.1)
- Detach the chain from the handle lever (see figure 1.2) and detach the flapper from the arms (see figure 1.3)
- Place the flapper in hot water (not boiling) for approximately 15 minutes.
- Using a mild soap solution, clean the plastic seating surface upon which the flapper was resting. (See figure 1.4) When finished the surface should be smooth to the touch.
- Remove the flapper from the water.
- Place the flapper (while hot) back on to the seating surface. Be sure to allow 1/4″ of slack in the chain between the handle and the flapper.
- Replace the vacuum jug.
- Turn on the water. When the cold water contacts the hot flapper, it should form itself to the seating surface and provide for a satisfactory seal.
Figure 2.0
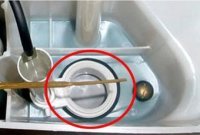
Figure 2.1
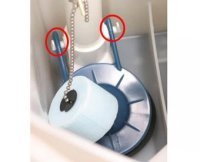
Figure 2.2
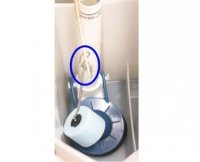
Figure 2.3
Figure 2.4
-
My Vacuity is spraying water up onto the toilet seat.
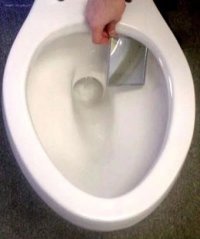
- Using a mirror, examine the holes under the rim of the bowl for any debris. See figure 3.0
- To be certain rim holes are clear debris, clean the holes using a 6d or 8d nail or piece of soft copper wire.
- Flush to test. Using a mirror observe the flow of water from the rim holes to be sure that it is running along the sides of the bowl. **This step may require multiple flushes in order to check all the holes.**
Figure 3.0
-
My Vacuity runs every few minutes then stops.
- Turn off water at the floor supply valve. (See figure 1.0)
- Flush the toilet to remove the water from the tank.
- Remove the vacuum jug. (See figure 1.1)
- Detach the chain from the handle lever (see figure 1.2) and detach the flapper from the arms (see figure 1.3)
- Place the flapper in hot water (not boiling) for approximately 15 minutes.
- Using a mild soap solution, clean the plastic seating surface upon which the flapper was resting. (See figure 1.4) When finished the surface should be smooth to the touch.
- Remove the flapper from the water.
- Place the flapper (while hot) back on to the seating surface. Be sure to allow 1/4″ of slack in the chain between the handle and the flapper.
- Replace the vacuum jug.
- Turn on the water. When the cold water contacts the hot flapper, it should form itself to the seating surface and provide for a satisfactory seal.
Figure 4.0
Figure 4.1
Figure 4.2
Figure 4.3
Figure 4.4
-
My Vacuity will not flush unless I move the metal rod inside the tank.
- Turn off water at the floor supply valve. (See figure 5.0)
- Flush the toilet to empty the water out of the tank.
- Grab hold of the cap assembly with the gray arm resting on your thumb. (See figure 5.1)
- Holding the gray arm in the “up” position, turn the entire cap assembly counter clockwise ¼ turn (See Figure 5.2) and lift to disconnect the cap from the shaft.(See figure 5.3)
- Disconnect the gray arm from the metal rod. (See figure 5.4)
- When you turn the cap assembly upside down you will see the black seal (see figure 5.5) with a small diameter metal rod protruding from the center.
- Remove the seal and replace with the new Fluidmaster 242 seal.
- Place the gray arm back on to the metal rod.
- Place the cap assembly over the shaft, hold the gray arm in the “up” position, and turn the cap assembly clockwise until it locks into position. *Make sure that the metal rod is positioned on the left side of the divider. (See figure 5.6)
- Turn on the water at the floor supply valve.
- Flush to test.
Figure 5.0
Figure 5.1
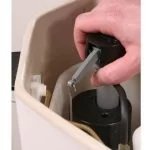
Figure 5.2
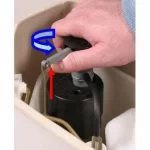
Figure 5.3
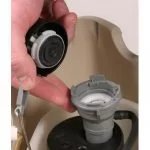
Figure 5.4
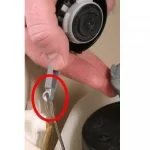
Figure 5.5
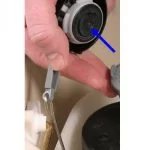
Figure 5.6
-
My Vacuity won’t stop flushing.
- Carefully remove the tank lid.
- Locate the handle rod. (See figure 6.0)
- Bend the handle arm towards the front of the tank so that it clears the plastic vacuum jug. When bending please be careful not to break the rod.
- Using two pairs of pliers may help; one to bend the rod with and the other to hold the rod in place at the first bend point. (See figure 6.1)
- Replace the tank lid.
- Flush to test.
Figure 6.0
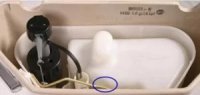
Figure 6.1
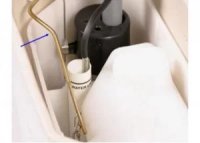
Figure 6.2
-
The water in my Vacuity Tank keeps running and overflowing into the overflow tube.
There are three possible fixes for this scenario: resetting the water level, checking the valve seal, and cleaning debris under the valve seal. Let us begin with resetting the water level.
- Locate the water level adjustment clip. (See figure 7.0)
- To change the water level squeeze the top and bottom of the clip together and slide the clip down the rod to lower the water level. Sliding the clip up raises the water level. Do this in 1/8″ increments until the proper water level is reached.
- Flush and repeat as necessary until the water level is at or slightly above the water line mark on the overflow tube. (See figure 7.1)
Figure 7.0
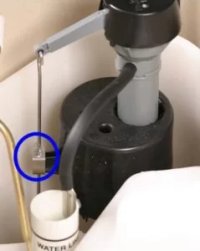
Figure 7.1
General Questions
-
What is Proposition 65?
In November 1986, California voters approved a ballot initiative to address concerns about exposures to toxic chemicals. That initiative became The Safe Drinking Water and Toxic Enforcement Act of 1986, better known by its original name, Proposition 65.
What does Proposition 65 require?
First, it requires the Governor of California to publish a list of chemicals that are known to the State of California to cause cancer, birth defects or other reproductive harm. Over 700 chemicals and materials, including many metals and plastics, have been listed as of March 10, 2000.
Second, it requires Manufacturers to provide a “clear and reasonable” warning before exposing anyone to a listed chemical. This warning can be given by a variety of means, such as by labeling a consumer product, by posting signs at the workplace, or by publishing notices in a newspaper.
What does a Proposition 65 warning mean?
It means that the Manufacturer issuing the warning believes that one or more listed chemicals is present in its product, even if it is only present in trace quantities. Briggs Plumbing has chosen to label all of its products available in North America. We use language approved by the State of California as follows:
Warning: This product contains chemicals known to the State of California to cause cancer and
birth defects or other reproductive harm.What kinds of chemicals and materials are on the list?
The list contains a wide range of chemicals and materials, including many metals and plastics, dyes, solvents, pesticides, drugs, food additives, and byproducts of certain processes. These chemicals may be naturally occurring, or synthetic. Some of them are ingredients of common household products, others are specialty chemicals used in common industrial applications.
How can I get more information?
The California Office of Environmental Health Hazard Assessment, OEHHA, maintains a comprehensive website at http://www.oehha.ca.gov/prop65.html. This website explains the law and offers a list of all the chemicals and materials.
You can also call the Office of Environmental Health Hazard Assessment’s Proposition 65 Implementation Office at (916) 445-6900.
-
If I have a problem with my product what should I do?
Contact Customer Service toll free at 800-888-4458. Pictures, proof of purchase and installation date may be required.
-
How much can I expect to pay for a Briggs product?
Briggs provides only suggested retail prices as a guideline for wholesale and retail distributors. Keep in mind that prices may vary by model, color, region and distributor.
-
I need to replace my toilet seat. Can I order one from you?
Briggs toilets are designed to accept standard-size toilet seats, whether for elongated or round bowl types, making replacement or upgrades simple and convenient. Customers can choose from a wide variety of seats available from leading manufacturers, including Bemis, Kohler, American Standard, Church, and Mayfair, among others.
This compatibility ensures that homeowners and contractors can easily source seats in different styles, finishes, and features—such as slow-close hinges or ergonomic designs—without concern for fit.
-
If I have a problem with my product what should I do?
Contact the Customer Service Department toll free at 800-888-4458 for china and faucets. Pictures, proof of purchase and installation date may be required.
-
Warranty Information
Limited Lifetime Warranty
All Vitreous China Products
PLEASE READ CAREFULLY AND RETAIN FOR YOUR RECORDS
Briggs* Plumbing Products warrants this china product to be free from defects in material or workmanship for the lifetime of this product to the purchaser. Briggs* Plumbing Products promises to repair or replace china part for any china part of this product that proves, upon our inspection, to be defective in material or workmanship. All labor for de-installation and re-installation and transportation costs or charges incidential to warranty service is to be borne by the owner. Briggs* Plumbing Products provides no warranties, written or oral, beyond those contained in the Limited Lifetime Warranty.
EXCLUSIONS: This warranty expressly excludes plumbing fittings, toilet tank trim products - flush valve, ball cock, and trip lever (see specific warranty exclusions outlined below for these products). In no event shall Briggs* Plumbing Products be liable for incidental or consequential damages, for damages resulting from improper installation, or for damages caused by handling, neglect, abuse, or alteration. All implied warranties, including any warranty of fitness for any particular purpose of merchantability, or those that might arise from a course of dealing with the purchaser, or usages of trade, are hereby disclaimed or excluded.
Briggs* Plumbing Products warrants its toilet tank trim: ball cock, flush valve, trip lever, and plumbing fittings products to be free from defects in material or workmanship for a period of one year from the initial date of purchase and Briggs* Plumbing Products promises to provide a replacement toilet tank trim product for any tank trim product and/or plumbing fitting product that proves, upon our inspection and within one (1) year from date of initial purchase, to be defective in material & workmanship. All labor for de-installation and re-installation and transportation costs or charges are to be borne by the owner.
Briggs* Plumbing Products shall not be responsible or liable for any failure or damage to its toilet tank trim, plumbing fittings, or china products caused by the use of either chloramines or hight concentration of chlorine, lime/iron sediments and/or other minerals not removed from public water during the treatment of public water during the treatment of public water supplies or caused by toilet tank type cleaners containing chlorine, calcium hypochlorite, and/or other chemicals.
NOTE: Some states do not allow limitations on an implied warranty, and some states do not allow exclusions or limitations regarding incidental or consequential damages, so the above limitations may not apply to you. This warranty gives you specific legal rights, and you may have other rights which vary from state to state. No person is authorized to change, add to, or create any warranty or obligation other than that set forth herein.
Limited One Year Warranty
Toilet Tank Trim and Fittings Products
Briggs® Plumbing Products warrants its plumbing fittings and toilet tank trim including: ball cock, flush valve, and trip lever products to be free from defects in material or workmanship for a period of one (1) year from date of purchase, and Briggs* Plumbing Products promises to replace any of these products that proves, upon inspection within one (1) year from the date of purchase, to be defective in material or workmanship. All labor for de-installation and re-installation and transportation costs or charges incidental to warranty service are to be borne by the owner. Briggs* Plumbing Products provides no warranties, written or oral, beyond those contained in this Limited One Year Warranty.
EXCLUSIONS: In no event shall Briggs* Plumbing Products be liable for incidental or consequential damages, for damages resuiting from improper installation, or for damages caused by handling, neglect, abuse, or alteration. Briggs* Plumbing Products shall not be responsible or liable for any failure or damage to its plumbing fittings or toilet tank trim: ball cock, flush valve, and/or trip lever products caused by the use of either chloramines or high concentration of chlorine, lime/iron sediments, and/or other minerals not removed from public water during the treatment of public water supplies or caused by toilet tank type cleaners containing chlorine, calcium hypochlorite, or other hypochlorite, or other chemicals. All implied warranties, including any implied warranty of fitness for any particular purpose or merchantability, or those that might arise from a course of dealing with the purchaser or usages of trade, are hereby disclaimed and excluded.
NOTE: Some states do not allow limitations on an implied warranty, and some states do not allow exclusions or limitations regarding incidental or consequential damages, so the above limitations may not apply to you. This warranty gives you specific legal rights, and you may have other rights which vary from state to state. No person is authorized to change, add to, or create any warranty or obligation other that set fort herein.
To obtain warranty service or copy of this warranty, contact your local dealer and/or the contractor from whom you purchased the product.
For assistance, please call 1-800-888-4458
Faucet Questions
-
My faucet is leaking; how do I fix it?
The most common leak is a drip from the end of the spout. This drip can usually be fixed by replacing your stem or cartridge, which turn on and off the water in the faucet. You need to determine whether it is the hot, cold or both sides causing the leak. You can then remove the stem or cartridge, which lies beneath the handle and locate a store near you that carries our replacement parts, or you can call Customer Service at 800-888-4458 to obtain information on replacing the stem/cartridge. For warranty information, please refer to your warranty cards sent with the faucet. If you have misplaced these please refer to our warranty section on this website.
-
How do I replace my stem or cartridge?
The first step is to shut off the water supply to your faucet. The next step is to remove the index button on your handle, screw, and then the handle should come off. Note how the cartridge is in place, direction, etc. Then remove the cartridge and place the new cartridge the exact same way as the other one was positioned. Replace the handle components and turn the water on to test to make sure that everything is working properly. If you have any problems, please call Customer Service at 800-888-4458.
-
Can I replace my faucet myself?
Yes. With every Sayco/Briggs faucet shipped out, we send installation instruction in the box. These instructions are easy to read and understand. If you misplace these installation instructions we have them available on this web-site for you. If you have any difficulty installing the faucet, please give Customer Service a call at 800-888-4458.
-
I installed a tub and shower faucet and I am not getting water out?
The most common installation mistake on a tub and shower unit is the installation of the body tee. Check the product to make sure the word “TUB” embossed on the body tee is facing down towards the floor. If the word “TUB” is facing up toward the ceiling, you have installed it upside down. If this does not solve your problem, please call our Customer Service Department at 800-888-4458.
-
There is no place in my area that carries Sayco/Briggs replacement parts. Can I order direct from you?
Yes. Contact our Customer Service Department at 800-888-4458 for details on how to order faucet replacement parts or inside toilet tank replacement parts. You can also contact Customer Service for toilet tanks, tank lids, bowls, seats, sinks, and tubs.
-
Why should I use Sayco/Briggs replacement parts?
If you use replacement parts other than parts made by Sayco/Briggs in our products, we cannot guarantee that they will work properly and last as long as they were intended to. To insure that the parts will work properly and last, we suggest that you use only our genuine parts.
-
Can I hook my portable dishwasher up to my Sayco/Briggs faucet?
It is not recommended. Hooking a portable dishwasher can cause excessive pressures and torque that can cause damage to your faucet which will invalidate your warranty.
-
How do I determine the model number of my faucet?
The most common place to find the model number is on the label of the box you purchased the faucet in. (We suggest you write this number on your warranty card for later use if you disguard the box). If you do not have the box or paperwork, try scrolling through our faucets found on this website for a visual identification. If you still cannot locate the model number then please call our Customer Service Department at 800-888-4458.
-
How do I determine which type of cartridge I have if I lost my paperwork?
Due to the fact that Sayco/Briggs has various styles of cartridges available, please contact our Customer Service Department at 800-888-4458. Please be sure to have the cartridge in front of you ready to describe it to our representative.
-
My faucet has low water pressure; how do I fix this?
The most common reason for low water pressure is the buildup of debris in the water line or aerator. You may need to flush out your faucet. Step One. Flush the aerator by removing it and then cleaning any dirt from the screens that may be causing a blockage. Replace the aerator and test the faucet to see if pressure has been improved. If the pressure has not improved, try step two. Step Two. You can flush your faucet water lines by first shutting off your water supply at the stop. Remove the index button of the handle, screw, and handle. Remove the cartridge or stem and flush thoroughly with water by turning the stop on slowly. Replace the stem or cartridge in the faucet in the exact position you removed it from and replace the handle assembly. Turn the water supply back on. Turn the handle to the open position and see if your flow has improved. If this does not take care of the problem please contact our Customer Service Department at 800-888-4458.
Glossary
-
ADA
Stands for the American Disabilities Act and has become known as “Handicap” or “Comfort Fit” toilets.
-
Bolt Caps
Decorative, color-coded caps that cover the bolts that hold the toilet bowl down to the floor.
-
Flapper
Mounted on the flush valve and keeps the water in the tank until flushed.
-
Flush Valve
This is the valve that contains the flapper and the overflow tube.
-
High Efficiency Toilet (HET)
Any toilet that averages or surpasses 1.28 gallons per flush.
-
Lid
The removable top of the tank. The underside of the lid will usually contain the model number of the lid and the date of manufacture.
-
One-piece vs. two-piece
The one piece toilet is a self-contained unit whereas the two piece unit has a tank that is bolted to the bowl to form the complete toilet.
-
Refill Tube
Small diameter rubber hose that goes from the ballcock to the overflow tube. This hose supplies the water to the toilet bowl after flushing. There should be no “kinks” in this hose.
-
Rim Jet
Holes under the rim of the toilet bowl that direct the water down the sides of the bowl during flushing and refill. Check periodically with a 6d nail or 10 guage wire to ensure they are not clogged with chemical deposits (hard water).
-
Rough-in
The measurement from the “finished wall” to the center of the drain (center of the bolts holding the bowl down). This is normally 12″ but can be special ordered in the 10″ and 14″ models.
-
Seat
The actual seat that you sit on.
-
Tank
Contains the water used to flush the toilet and refill the bowl. The model number and date of manufacture will normally be located on the inside back wall of the tank near the water line.
-
Trip Lever
Located on the outside of the tank and is used to actuate the flush valve to initiate the flushing cycle. The chain or strap going from the handle assembly should have no more than 1/4″ of slack to keep the flapper from closing prematurely.
-
Water Control Valve
Usually referred to as the “Ballcock.” This is the valve that controls the water coming into the tank and turns on when flushed and off when the water is up to the “waterline” mark inside the tank.
-
Water Supply Valve
This is the valve located near the floor that supplies water to the ballcock/water control valve. This valve should be fully open at all times except for maintenance.
-
Wax Ring
Located between the bowl and the floor flange to provide a water-tight connection to the soil drain (sewer).
1-800-888-4458
customerservice@briggsplumbing.com
Briggs is a major supplier of lavatories, high efficiency toilets, bidets and urinals, and kitchen and bathroom faucets for residential, hospitality, and commercial applications.
© 2026 Briggs Plumbing. All Rights Reserved
Site by ALINE, A Marketing Company